How to Start a Fashion Blog.
The ultimate free guide to fashion blogging and beauty blogging!
- Learn how to start a fashion blog in 30 minutes.
- Choose the cheapest and most reliable hosting. I can highly recommend Bluehost.
- How to make money with fashion blogging.
- Creating a fashion blog with WordPress.
- How to get easy traffic to your own beauty or fashion blog.
Start by bookmarking this page!
HOW CAN I START BLOGGING ABOUT FASHION BLOG TODAY?
You’ve come to the right place to find out. My free comprehensive step-by-step tutorial will help you start your own fashion blog and make it an enjoyable, safe and profitable experience. This 30 minute guide will quickly get you started at the lowest possible cost and help you avoid the pitfalls of starting a new blog.
WHY SHOULD I START A FASHION OR BEAUTY BLOG?
Blogging is a great way to share your knowledge and ideas with the wider public, providing you with a creative outlet and helping you connect to others with similar interests.
Your ideas, energy and passion could put you at the heart of the huge online community of people with a passion for fashion.
Oh, and did I mention that you can make quick online cash blogging? The most popular fashion blogs can make as much as $20,000 (!) per month. Yes, thats correct, large personal blogs like Barefoot Blonde, The Cristelle Factor, and Cupcakes & Cashmere reportedly making from $10000-$20000 a month from advertising and shout-outs. If they can do it, what’s stopping you?
HOW DO I GET MY BLOG ONLINE?
Registering a domain name and opening an account with a Web Hosting company, whilst going through the tutorial will take 30 to 45 minutes, so if you don’t have that time free immediately you should bookmark this page or make it available offline.
STEP BY STEP GUIDE TO GETTING A FASHION BLOG ONLINE
1. Picking a Blogging Niche
You should try to choose what aspect of fashion or beauty to write about by picking something you feel you know the most about right now. You will always be able to develop your range of subjects as your experience and knowledge increases. But don’t limit yourself to too small a niche.
2. Selecting the best Blogging Platform
In my experience these four are the best open source platforms commonly supported by the majority of web hosting companies:
• WordPress –Widely used, accessible and very flexible Content Management System (CMS)
• Ghost – One of the latest CMS releases, getting more popular
• Joomla – Flexible CMS once you have spent time learning to use it well
• Drupal – Popular CMS, for more advanced users
I found that all these can produce first class content. For blogging newbies, WordPress is a clear favourite, largely because it is so simple to install and easy to use. WordPress also has excellent community support due to its popularity.
Some important benefits of WordPress:
• WordPress is simple to set up. Installation is fast and your blog can be live in a matter of minutes.
• Easy to use WordPress Interface – You don’t have to be an expert developer to put your content online quickly and professionally, leaving you more time to focus on the quality of your blog’s content.
• WordPress is made for blogging – WordPress is a custom tool built with the blogger in mind. It is set up to help you perform all the necessary actions of publishing a blog in the most efficient way possible. It will have exactly the function you need or allow you to add a plugin for more obscure functionality.
• You control WordPress – You personally manage the content of your blog, without having to pay IT professionals or wait for them to be available. Just log in to the dashboard and blog away whenever you want.
• WordPress is Secure – By updating their software constantly, WordPress ensure your protection from hackers that are searching for access to your data. Always have the latest version updated and pick a secure password so you can enjoy peace of mind.
3. Selecting a Web Hosting company
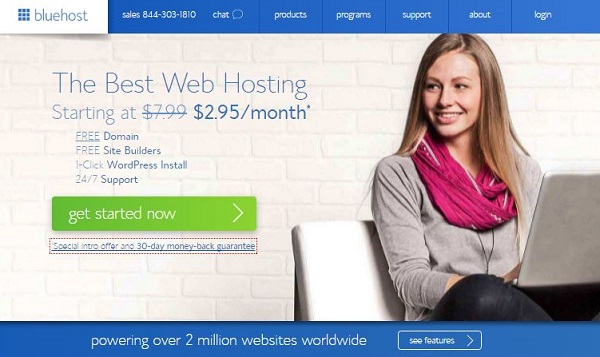
UPDATE: Bluehost is currently running a great promotion offering quality hosting for as little as $2.99 or $3.45 per month (was $7.99) For the price of a cup of coffee, you can now get world-class, reliable hosting for your blog, with a FREE domain name thrown in.
You can sign up at Bluehost.com.
Free platforms such as Blogger and many others also offer to host your blog. This incurs no up-front cost to the user and may seem like a great deal especially to a new blogger who doesn’t want to risk paying for something they may not enjoy or be good at.
As with everything free in life, it does have some strings attached and some important long-term negative implications.
Free platforms can delete your blog if you fail to meet the terms and conditions which you agree to when you sign up. They don’t have to provide a warning and generally they will not return your content to be posted elsewhere. That could represent many years worth of lost blogging on your behalf.
Use a picture without the right licensing or write something controversial and your blog is deleted forever with no way of getting it back.
Free blogging platforms do not allow you to post your own paid ads and affiliate links on their platform. Therefore, you can generate all the traffic in the world but it’s virtually impossible to make money online if you don’t own the domain and hosting. You will not be able to capitalize on the success of your own blog.
The free blogging platforms will not, in most cases, allow you to have a custom domain. This limits your ability to invent a catchy web address and as a result your blog may look unattractive and unprofessional to subscribers and any potential advertisers.
Free blogging platforms only provide very limited capacity for customising your blog. In all probability your blog will look very similar to thousands of other blogs on the same platform. This will make it difficult to create an interesting and unique blog that will attract the eye and the interest of new readers.
With all this in mind, it becomes clear why you should always self-host your own blog. You just have to engage a web hosting company to store your data and publish your blog on the internet. Most web hosts will also have a facility for you to buy the rights to a domain name through their software. It’s quick, simple and cheap.
You will own the rights to your work and have a degree of control over the status of your content. If for some reason you want to change your web host, you have the right to your data back so you can move your historic blog posts to the new company.
Web hosting in 2016 is a massive industry with a lot of competition between providers. This means that web hosting is very affordable and provides great value. From less than $5 per month you can get the basic packages that you would need as a newcomer. Your data is regularly saved (backed up) and protected from hackers and other malicious elements. You have a legal contract with the provider so you have the ability and move your blog anywhere you want without losing any of the content you have created.
From the many potential web hosting providers you must choose one that best meets your requirements considering all that you want the web host to provide.
A quick internet search will reveal hundreds of different companies, providing a spectrum of services, many starting as low as $3 per month for web hosting and domain registration.
If you have followed my advice you have already chosen the most popular blogging platform (WordPress) so you can be sure that it is compatible with the software of most web hosts, giving you as much choice as possible. WordPress is free to use for the blogger.
Of all the numerous hosting providers I have used over the years the one I want to strongly recommend as the best web host for creating new blogs is BlueHost.com.
I always choose this company for these 4 reasons:
- It is simple and quick to signup and install WordPress.
- Customer service is excellent.
- Hosting is flexible, reliable and safe.
- They are very, very affordable.
Luckily, they have a great offer available at the moment. If you decide to sign up to BlueHost right away they offer:
• An exclusive discount to TopSocialMedia.net visitors.
• FREE domain name registration for your new blog worth up to $15.
• Full Money Back Guarantee without a contract if you are not happy with their service.
Blue Host offer some excellent additional services:
• With Domain Privacy Protection nobody can see your name, address and contact details. If you are happy for that information to be public you can save a dollar each month by not selecting this option but it’s a very small cost for peace of mind and privacy.
• The search engine Jumpstart and the Sitelock functionality are useful for creating and publishing your blog. They can also be opted out from if you feel you don’t need them.
4. Choosing a Domain Name
The domain name is essentially the internet address of your blog. For example, the domain name for the website you are currently on is Topsocialmedia.net.
Try and think of something funny, snappy and clever considering your subject matter and relevant words or phrases that are common and recognisable by your reader.
Try and make it sound fun and professional at the same time. This is one of the hardest aspects to get right but it will pay off in the long run. Ideally you will want a domain name ending in .com as it will look more professional. If your idea has already been registered just keep thinking of new ones before you take one of the newer domain name endings like .net or .website. If the .com domain name you want is gone, you can even try to buy it from the current owner.
5. Sign up with Bluehost and start Writing Content.
1. First of all, by clicking the “Get Started” link you will be taken to the page for plan selection. Congratulations, you’ve taken the first step!
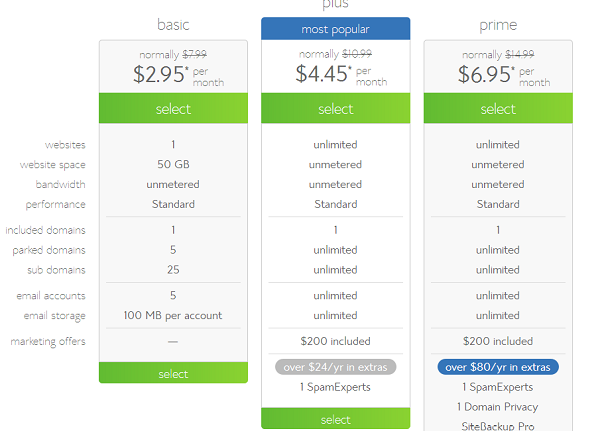
2. From BlueHost’s plan selection page, select a suitable plan considering all the information you have so far about what you want your blog to become. The “basic” plan is a decent option if you don’t intend to post a lot of videos and pictures. The next most expensive is the “plus” plan. This will give you unlimited email addresses and storage and also unmetered website space and bandwidth. The increase in cost is marginal and the added benefits significant so I would recommend the “plus” plan as a great value deal.
The Plan Selection Page looks like this:
3. Now you have selected the plan you are directed to the next page in order to register the domain name. Using the box on the left you can search to see if your idea for a website address has been taken. There’s a good chance someone else has thought of it before. If it is not available, keep trying with other ideas. If the domain name you are looking for is already registered with BlueHost.com, this page will show you some suggestions for similar names. Take your time; this bit is important now and for the future success of your blog.
It’s much easier if you have already registered the domain name of your dreams. Just type
your domain name in the right-hand box and click the “next” button. Now your domain name will be assigned to BlueHost, your new web host.
The Domain Page looks like this:
4. So now you’ve assigned your catchy new domain name to Bluehost.com. The next step is completing the domain registration information table. You should already have the information available so it shouldn’t take too long to fill in.
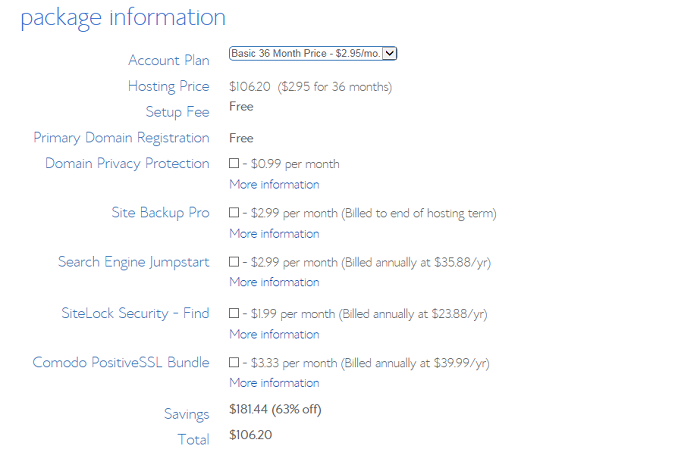
5. Lower down on this same page, you must complete the “package information” table by selecting your preferred hosting plan. As with most contracts of this nature, the longer you sign up for, the better price you get. The 36 month option is an excellent value option. If you don’t want to commit just yet for that long, the 12 or 24 month options are also great value in the current market, especially considering the fantastic service BlueHost provide. Depending on current promotions, you can get world-class hosting for as little a $2.99 or $3.45 per month, about the prices of a cup of coffee. Choosing a shorter period will give you a slightly higher, but still very low price, compared to most hosting competitors.
Using the tickboxes underneath you can opt in to numerous additional services for low fees. Maybe you don’t need them right away but it doesn’t hurt to click on the “More information” link to understand exactly what is being offered. You never know, one of these options may provide you with value straight away.
The package information page will look something like this (if you scroll down):
6. At the bottom of the same page, you must complete the “billing information” section with the details of your debit or credit card and click on “submit”. Well done, you’ve successfully registered with BlueHost one of the market leaders in web hosting!
The Billing Information page looks like this:
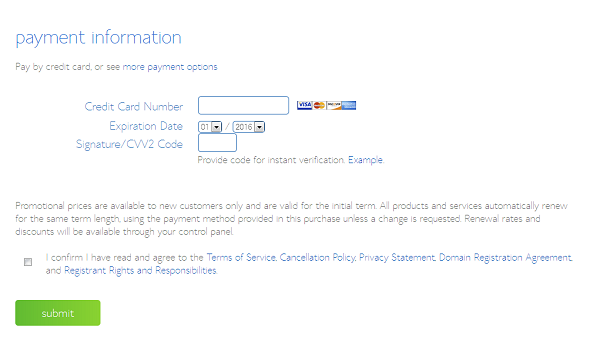
At the bottom of the page, simply enter your payment details. And you’re done!
7. Your new friends at BlueHost will now send you an email with your account and login information detailed. If you can’t find the BlueHost email immediately, just wait a few minutes and then check your spam folder. Many email providers will file the email there if the sending address is unfamiliar. This will depend on the settings of your spam filter.
Once you have the email, send some copies to your other email addresses so it’s easy to find in the future. Now is a good time to start a new email folder just for your blog.
8. Once you have all the details and you’ve paid BlueHost hosting, the next step is to log in to your new BlueHost account using the details included in the welcome email you received.
This is what the login page looks like:
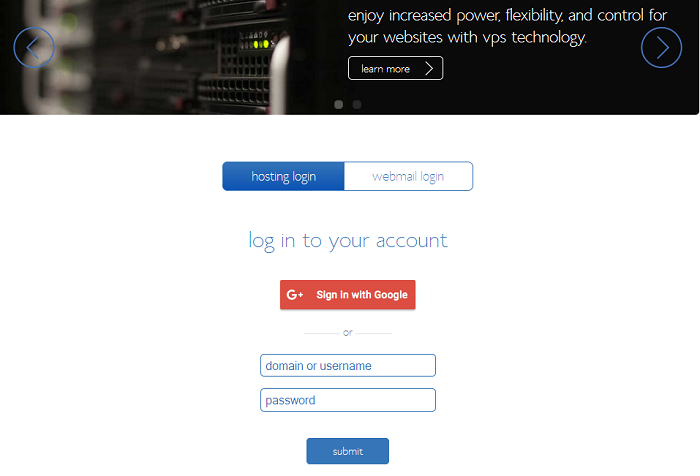
Press ‘Login’ in the Top Right corner of Bluehost’s Homepage to get to the login page.
Click the “hosting login” tab and use your domain name and the password (from the email in section 7) to log in. Press “submit”. You’re now active on BlueHost!
9. With all the boring admin completed, you are now free to spend your time generating interesting and creative new content for your new blog and expressing your thoughts and ideas to the huge blog-reading community.
The first place to visit is the BlueHost control panel. Click on “hosting” on the top menu and then under that click on the “cpanel” button. This is the control panel of BlueHost. This screenshot shows what the page looks like:
On the “website” section which is the 3rd section down, you should click the “Install WordPress” button. This will take you to the free install page for WordPress on Mojo Marketplace.
Start the installation by clicking the “Install” button, you are moments away from installing the web’s most popular blogging platform onto BlueHost.
The page looks like this:
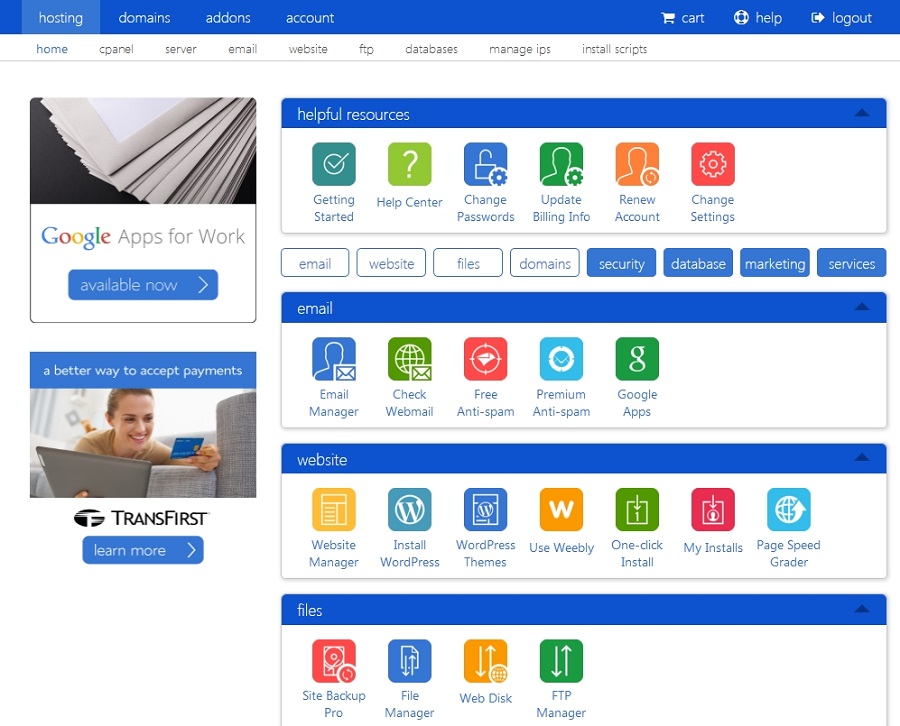
On this screen, click on “Install WordPress” to install the WordPress Blogging Platform in just 2 minutes.
10. Now you will be asked by BlueHost onto which domain name you want to install WordPress. Click the arrow on the drop-down list and select the domain name from section 3 (it will be the only one on the list at this point).
It is best practise to install WordPress directly to the root domain rather than install in another folder or directory on your registered domain so you should leave the directory window blank and just click the button for “Check Domain”.
The check box below this section will allow you to select the more advanced options by opening up the advanced option table.
Now you must put in:
• Your site title (domain name without the ending (.com for example).
• Your preferred username (please do not put “admin” as it is very common and will only serve to help hackers and weaken security).
• Your password (At least 13 characters, mixing of capital and lower case letters and some numbers).
You can change these details later, with the exception of the username.
Follow good practise by physically writing your username and password down and keeping them in two separate safe places in your office or home without anything written down that would connect the two.
Do not store them on your computer itself as this is also vulnerable to unauthorised hacker access same as the password storing facility on your browser. Put it on paper and separate the user name and password physically so only you know they are connected.
Now this section is complete, you must agree to the terms and conditions by selecting the tick box and press the “Install Now” button.
In a few moments, WordPress will be fully installed on your domain. Mojo will follow up with an email containing all the login information. Check your email and don’t forget to check the spam folder if you can’t see the response straight away.
PICKING A SUITABLE WORDPRESS THEME FOR YOUR NEW BLOG
WordPress themes are basically blog templates. They can be changed, adapted and customised to suit the style and feel of your blog. If you want your blog to look professional and classy, a clear and classic design would work well. Alternatively you can use bright colours and bolder designs to create a more fun looking blog that will attract the attention of your potential readers and help you express your personality and creativity.
WordPress dashboard has many free themes available to try out. These will however be widely used by the blogging community so your new blog will not seem unique and exciting if it fails to stand out from the others.
You can buy some really cool (and classy) blog themes from these 4 sources:
• Mythemeshop
• Themeforest
• WordPress Web Library
• StudioPress
I would recommend that you go with a “responsive design”. This will make sure that your blog’s layout can adapt to the multitude of screen sizes on the smart phone and tablet market, without losing functionality and the unique style you have created.
More and more people are using tablets and smartphones to read blogs so a responsive design will future-proof your work and safeguard its accessibility.
HOW TO INSTALL NEW BLOG THEMES ON WORDPRESS
The free WordPress dashboard themes are really easy to install, you just have to click “Install” on the preview screen. Toggle back and forth between the free ones to see if any jump out at you as being the style you had in mind. It doesn’t cost anything and it’s interesting to see your blog in all the different formats.
Themes that you pay for will typically come in a compressed file (.zip format). The WordPress dashboard allows you to upload these directly without decompressing (unzipping), in a similar way to attaching documents onto email.
It’s really that simple. Log in to your WordPress blog as per step 8, then click through: APPEARANCE > THEMES > INSTALL THEMES > UPLOAD THEMES.
Your blog template is now ready to be populated with your thoughts and ideas.
The WordPress Upload Themes page will look something like this:
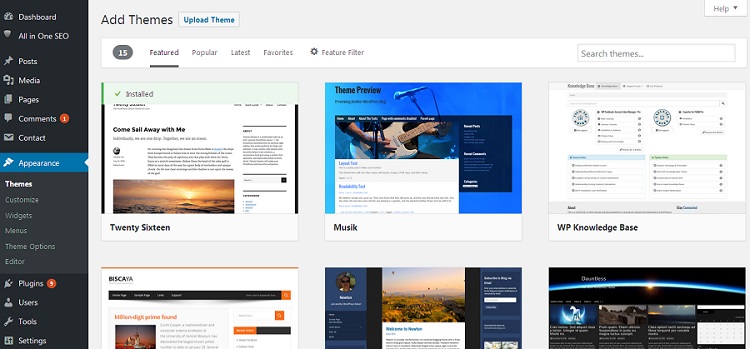
Click on “Upload” to upload a .Zip file. Or use the Search Theme function on the right, to search for Free Themes.
At this stage it’s worth mentioning that it is a good idea to build some structure into your blog format with some commonly found sections. New readers can learn more about you if they can read your interesting “About” page. This will help them engage better with you. A “Contact” page will make it easier for subscribers or potential commercial partners (how to make cash from your blog) to get in touch with you. You can leverage your existing connections by including your social media links and this will help get your blog out there and make it popular.
That brings us to the end of this tutorial. Thank you for reading and I hope you found it helpful. Now that you are all set up all that remains is to get out there and start blogging! Good luck.

