How to Start A Food Blog.
The ultimate FREE guide to starting a food blog in 30 minutes.
So, you are passionate about writing and passionate about food?
Why not combine the two and start a food blog. It might even make you some extra income. And a blog is much easier to set up, than most people expect.
In 2016 blogging is more popular, and easier, than ever. There are thousands of food blogs online, that actually create a significant income for the blog owners. The most successfull food blogs, like PinchofYum.com, ThePioneerwoman.com and Skinnytaste.com reportedly make $10000-$50000 per MONTH, on advertising alone. If you could just get a fraction of that success, it will be worth your while. And fun too.
I will show you how you can easily set up your own food blog in less than 30 minutes.
Please bookmark this page if you are planning to start a blog when you have some extra time.
This is what I will cover:
- Choosing the Best Blogging Platform
- Getting a Domain Name (Bluehost will give you your Website Name for free).
- Getting Web hosting (I prefer Bluehost.com. They are the cheapest, but also among the most reliable)
- How do I write content and upload it? (Installing WordPress).
- How do I get traffic and earn money from my blog?
WHY SHOULD I START BLOGGING ABOUT FOOD?
Blogging is a wonderful outlet for connecting with like-minded people and sharing information and ideas. You could use your creativity to build a following amongst others that are passionate about food.
You may be invited to restaurants to review them for your blog, meet the chef and learn more about sourcing and preparation.
Advertisers and affiliated sites and blogs will PAY YOU to host their adverts and links on your popular food blog. Some of the top food bloggers can make us much as $20,000 every month. That’s some serious online income. It could be the start of a new exciting career in a field you are passionate about. What do you have to lose?
WHO WILL CARE ABOUT WHAT I HAVE TO SAY ABOUT FOOD?
You will be really surprised. Blogging is huge now. It is becoming the most popular channel for publishing news, information and entertainment on the internet.
Traditional media is in terminal decline, and the public, disillusioned by the media’s often political agenda, are turning instead to normal people like you and me, who compile the millions of blogs online. We don’t have an agenda; we just call it as we see it.
Ok, you may not be a trained chef or a producer of food or even a nutritional expert. But what you are is even more relevant. You are the consumer. Your opinion is the one that counts. Not only will other consumers want to read what you have to say but food professionals would also be extremely interested.
You can blog about any aspect of food that you feel passionate about: Recipes, restaurants, food ingredients, health food, baby food or shopping tips. If you can write coherent, interesting blog posts your potential readership is anyone who has access to the internet and eats food. That’s a pretty huge number. You only have to attract a tiny fraction of the overall market and you will have a hugely successful food blog.
HOW DO I DO THE TECHNICAL STUFF?
This part may take some time, but don’t worry I’m here to walk you through it. It’s a good idea to bookmark this page or make it available offline if you don’t have 30 minutes to 1 hour free right now.
THE THOUGHT PROCESS OF CREATING A FOOD BLOG
1. What aspect of food will I write about? – ‘Blogging Niche’
2. What software do I need? – ‘Blogging Platform. I recommend WordPress.’
3. What shall I call it? – ‘Domain Name’
4. Who will store my data and make my blog available online? – ‘Web hosting. I can recommend Bluehost’
5. How do I produce the actual content? – Installing WordPress onto your hosting account
WHY WORDPRESS?
There are many free platforms, such as Blogger which will also host your blog. This is clearly very tempting with no initial cost to the user, especially to a novice blogger who will be uncertain of the future popularity of his blog.
There are however some significant long-term drawbacks. You must consider the future quite early on if you want a successful blog.
I can not stress this enough, you should always look to self-host your blog. Self-hosting means that you pay a third party (the web host) to store and distribute your blog to the public. You can also purchase the rights to a web address (the domain name) through them. Practically, ALL the blogs and websites that you know and love, have Web Hosting.
This means you own the intellectual rights to your work and have physical control of your content. Conversely, a free platform can remove your blog if you break even one of the terms and conditions which you agree to (without reading usually) when you join. They can do this without warning and in many cases they will not even give you back your own content, which could be many years worth of work.
Write the wrong thing, or use an image without proper consent just once and your work is gone with no recourse open to retrieve it.
In any case it’s virtually impossible to make money online if you don’t own the domain and hosting. Free blogging platforms will stop you from posting your own paid ads and affiliate links on your blog. Even if you can generate the traffic you are hoping for, your online money earning potential is forever severely limited.
With all the competition out there, web hosting is very affordable in 2016, from as little as $2.99 per month for the basic package a novice would need. It also means that your data is regularly backed up and protected and you have the right to recover it and move it elsewhere whenever you want.
Another major long term drawback with free blogging platforms, is that most of them will not let you have a custom domain. As a result, your web address will not be ‘catchy’ and may look unprofessional to potential advertisers and subscribers.
The limited level of customisation free blogging platforms provide will make it difficult to create a unique and memorable site that will make a lasting impression to the reader.
Here are, in my opinion, the best open source platforms supported by hosting companies:
• WordPress – Most used and customisable Content Management System (CMS) in the industry
• Ghost – Newer CMS but gaining popularity
• Drupal – Widely used but difficult for beginners
• Joomla – Good functionality but hard to learn initially
I have personally worked quite happily with all of these, but WordPress is the one I have to recommend for creating your first blog. It’s easy to use and widespread so someone, somewhere, has answer to your technical question.
Here are the main benefits of WordPress:
• Simple WordPress Setup – A few clicks and you’re sorted. You could be posting a blog within minutes.
• Intuitive WordPress Interface – Posting media and editing content for your blog has never been easier or quicker. Save time with all the fiddly stuff and use it to focus on the quality of the content
• WordPress Specialization – WordPress is designed and built for blogging so all the functionality you will need is either built in or can be added via plug-ins in moments
• WordPress Independence – You control the content of your blog, without the cost or delay of web developers or designers. Log in to the dashboard and get blogging straight away yourself
• WordPress Security – WordPress update their software constantly to ensure it’s secure and keeps hackers and other malicious elements from your data. Just keep the application updated with the latest versions, choose a secure password and you will have worry free blogging.
CREATING A FOOD BLOG WITH WORDPRESS – STEP BY STEP
Following our process earlier you will already have chosen what aspect of food to write about. I can not help you with this; it has to come from within you. Choose something you are knowledgeable about now and you can always branch out as your knowledge and experience grows. We’ve also already chosen WordPress as a blogging platform. The next step is to choose a domain name.
Choosing a Domain Name
This the internet address of your website, For example, the domain name for this website is www.TopSocialMedia.net. Something catchy, clever and humorous would be ideal. Think about your blogging niche and words and phrases associated with it. Keep it clean and relevant. It’s not easy, I know. Generally domain names ending in .com are better so if you find your idea is taken, just try and think again before settling for one of the newer endings. Otherwise, someone else will always have the same domain with the more recognizable .com ending and you may lose traffic to them or if you’re successful you may have to buy it from them at a premium.
Choosing a Web Host
This is the company who will publish, store, and protect your blog so care must be taken in choosing the one that best meets your needs. Many different companies provide an array of services starting at $2.99 per month for domain registration and web hosting. Thankfully we have chosen the WordPress platform, which is free to use for web host subscribers and compatible with almost all hosts.
I have used many hosting providers and the one I really must highly recommend as the best web host for setting up a new blog is BlueHost.com. Their installation process is simple and quick, they provide great customer service and their hosting is safe and reliable.
And on top of that, they are actually the cheapest, among the larger, established hosting companies.
They currently have a great offer, with hosting starting from as little as $2.99 or $3.45 per month (was $7.99), so if you sign up to BlueHost today you will get:
• A great discount exclusive to Topsocialmedia.net visitors.
• One FREE domain name worth up to $15 for your new blog too!
• Money back guarantee with no contract if you don’t like their service.
Some of the great additional services Blue Host offer:
• Domain Privacy Protection means that people can’t see the name, address and contact details of the blogger although if you don’t care about this, you can deselect it and save a dollar a month. Personally, I would prefer to pay this small amount for peace of mind, but you can click this option off, if you don’t think you need it.
• Sitelock or the search engine Jumpstart will help with running your blog but are not crucial and can also be de-selected
Get Started with BlueHost for just $2.95 per month.
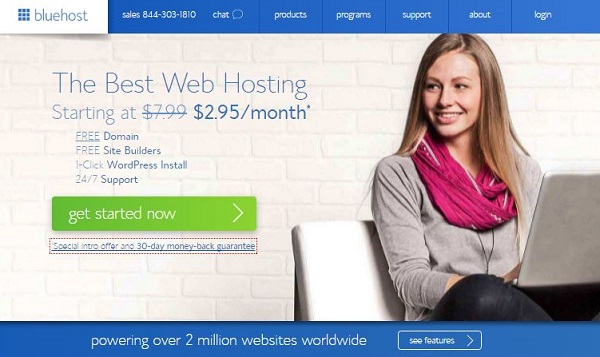
1. Click the green “Get Started” button to go to the plan selection page. Well done, you’re now on your way to creating your very first blog. How exciting!
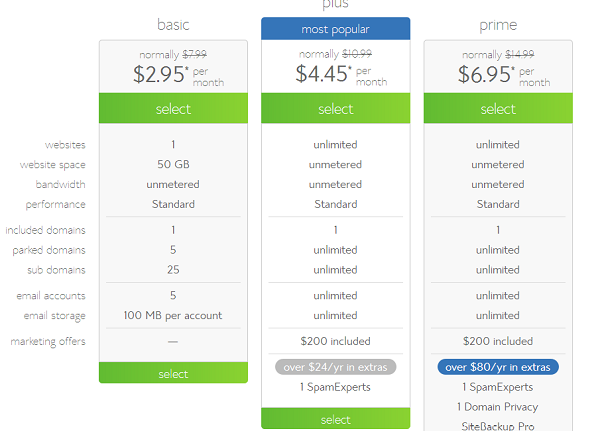
Choose the package that suits you!
2. On the BlueHost plan selection page, remember all that we have considered so far and use that information along with your future expectation of the format of your blog to select a suitable plan. Unless you plan to post a lot of images and videos on your blog, for now the “Basic” plan is probably an adequate option. The “Plus” plan is the next one up and for a very small increase in cost, you get unmetered website space and bandwidth as well as unlimited email addresses and storage and quite a few other benefits. It’s a great value deal in my opinion.

Choose a FREE domain name for you blog!
3. The plan has now been selected so we move on to the next page where we will deal with the domain name. If you don’t have a domain registered to your name, use the box on the left to check if your idea for a domain name has already been taken. If it’s gone, just keep trying with different names. If the domain name you want is already registered with BlueHost, they will generate a number of similar sounding suggestions for your consideration. Naming the domain is a key aspect of creating a successful blog, so take your time.
If you have already registered a suitable domain name, things are a bit easier. Enter the name in the box on the right and click “next”. This will assign your domain name to your new web hosting company, BlueHost.
4. Now you’ve got your dynamite domain name and you’ve assigned it to Bluehost.com. Up next is the domain registration page. Next, you have to complete the section with all the registration information. It’s all the usual static data you probably have stored in your browser so it should not take more than a few minutes to complete.
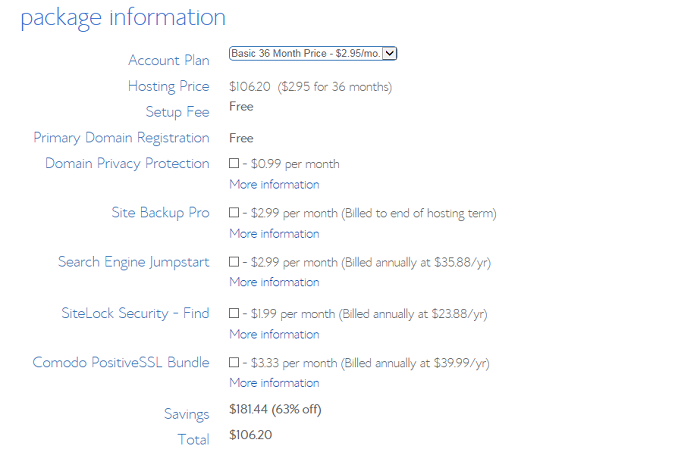
Choose the period length, and extras, of your package!
5. Staying on the same page, scroll down to the “package information” section. Now you can select your hosting plan. As with everything in life, you will find that the longer you commit, the better value you will receive. I usually go for the “basic” plan for 36 months and get a great deal on hosting. The Basic Package deal will cost you just $2.99 per month, without extras, if you sign up for 36 months, which is the absolute lowest price, that you can find among the large, reliable hosting companies. But don’t worry, if you can only afford the 12 or 24 month sign-up. BlueHost still offer excellent value for shorter period relative to the rest of the hosting companies. And you can always extend after 1 year if you choose to.
The tickboxes just below offer you a number of additional services at reasonable fees. To be perfectly honest you probably don’t need any of them at this stage, but do take the time to click on the “More information” link to see exactly what the service is. It is possible you may immediately benefit from having these facilities.
*If it is the 2nd time, you visit the Bluehost Signup page, the website cookies will sometimes quote you a slightly higher price. But fret not, you can still get the lowest price, simply by copying and pasting the page address of THIS page (https://topsocialmedia.net/how-to-start-a-food-blog/ into a NEW Private Browsing window, or by opening another browser and copying the my page there. Then, click from my page through to the Bluehost page, and you should get the lowest prices, again.
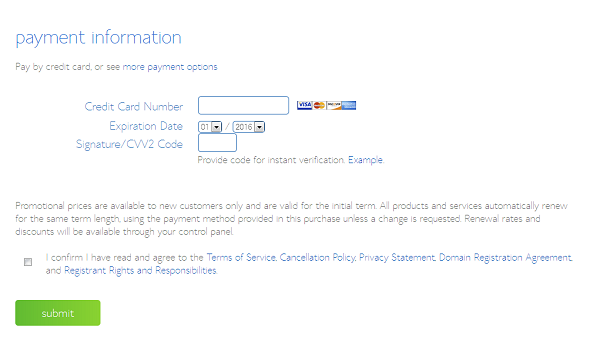
At the bottom of the page, simply enter your payment details. And you’re done!
6. Next, still on the same page, scroll down to the bottom and complete the “billing information” section with your credit/debit card details and click “submit”. Congratulations, you are now registered with BlueHost!
7. BlueHost will follow this up with an email detailing your account and login details. Login into and check your email. If it’s not there yet, wait a while and remember to check the spam folder as your email client may divert the email there depending on your spam filter settings. Once you find the email, save a few copies in various folders, in case you need to refer to it in the future. It’s a good idea to start a new folder in your email client, just for your blog.
8. Now you’re a fully paid up client of BlueHost hosting, the next step is to login to your BlueHost account using the details from the welcome email.
The login page can be found at www.my.bluehost.com/web-hosting/cplogin , and will look something like this:
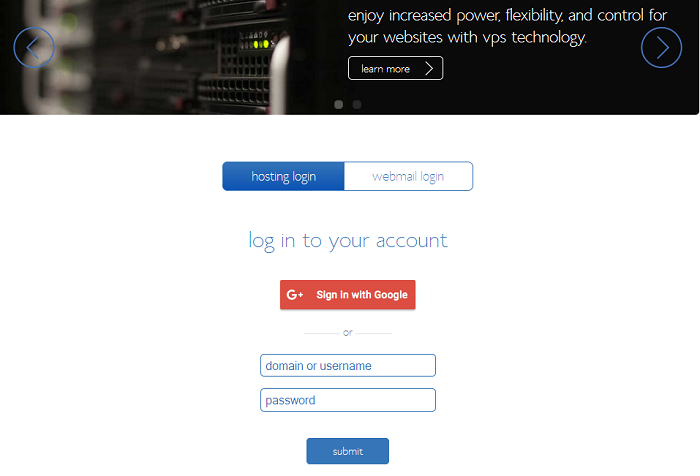
Press ‘Login’ in the Top Right corner of Bluehost’s Homepage to get to this login page!
Select the “Hosting Login” tab and login by using your domain name and the password. This information will all be in the email you received in step 7. Click “submit”. You’re in!
9. Now all the admin is out of the way, you can get on with the exciting project of creating your amazing new blog and sharing your ideas with the blogosphere.
From the top menu, select “Hosting” and then just below select “cpanel”. This is the control panel of BlueHost. Here is a screenshot of the page you should be on:
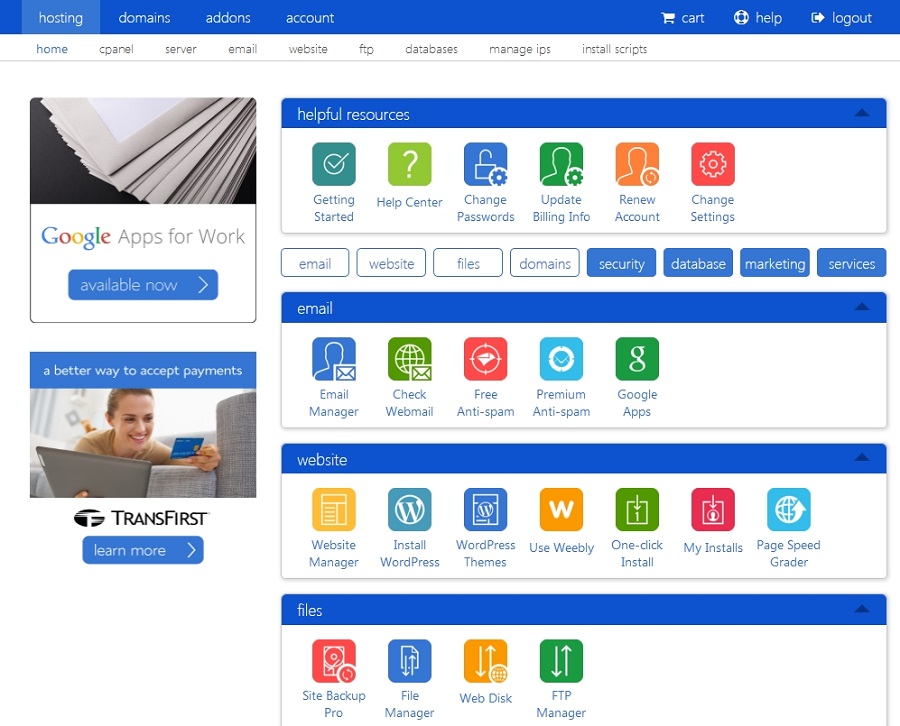
On this screen, click on “Install WordPress” to install the WordPress Blogging Platform in just 2 minutes.
Scroll down to the “website” section (3rd section down), then click on “Install WordPress”. You will be redirected to Mojo Marketplace where you will see a free install page for WordPress. Click the green “Install” button to start the process and get the web’s leading blogging platform instantly installed onto BlueHost.
10. Next up, BlueHost will ask you which domain name you wish to install WordPress onto. Select the domain name you have purchased with the BlueHost hosting or the one you already owned. The domain name will be visible in the drop down box if you click the arrow.
I recommend that you always install WordPress directly to the root domain instead of creating the install in another folder or directory of your domain.
So leave the directory window empty and click the green “Check Domain” button.
Just below this section a check box will allow you to view the more advanced options. Click it and the advanced option table will open up.
On this table, input:
• The title of your site (without the .com, .net or whatever the ending is).
• the username you want to use (Choose memorable username, the longer the better).
• The password you want to use (Choose a password that is minimum of 13 characters long, mix of capital and lower case letter and some numbers, but definately something, that you can remember!).
All these details with the exception of the username can be changed later if you wish.
Write your username and password down and store it in a safe place in your home or office, perhaps separating the location of the two for extra security. You can also store it on a file on your computer but this will obviously be vulnerable if hackers gain access to your system. I would not recommend allowing your browser to store the password (“remember password”) as the browser is also vulnerable to hacking, putting you at risk.
With all the fields in this section now completed, it just remains to agree to the terms and conditions by selecting the relevant box and click the green “Install Now” button.
WordPress will now be installed on your domain in a few moments. Mojo will also send you an email with all the login information, so be sure to check your mailbox for this (remember to check the spam folder again).
CHOOSING THE BEST WORDPRESS THEME FOR YOUR BLOG
The themes for WordPress are essentially templates for your blog which you can change, adapt and customise to fit the exact purpose, nature and style of your blog. For a fun and attention grabbing blog you may want to use bright colours and bold designs to attract the eye and help get across your message and personality. If your blog is of a more professional nature, a classic clear, simple and classy design will probably be more suitable and help readers take you seriously.
Free themes are available through the WordPress dashboard, so you can try some out for no cost but obviously these will be very common amongst other blogs and will not help your new blog seem unique and exciting.
Alternatively, here are some of the best places to buy blog themes:
• Mythemeshop
• Themeforest
• WordPress Web Library
• StudioPress
As the numbers of people using tablets and smartphones to access the web and read blogs is rising and likely to continue to do so, it makes good sense to select a “responsive design”. Responsive designs will allow your blog’s layout to adapt to the many different screen sizes on the market, without losing functionality and affecting the stylish appearance you have worked so hard to achieve.
INSTALLING NEW WORDPRESS BLOG THEMES
If you decide to go for a free theme from the WordPress dashboard, all you need to do is click “Install” on the preview screen. Try a few of these out and see if any stand out as a good match. You are always able to switch back and forth for free until you find the right one.
If you buy a theme, it will come in a compressed file (.zip format). This can be uploaded directly on the WordPress dashboard without decompressing (unzipping).
Just log in to your WordPress blog as normal (step 8 above), then follow: APPEARANCE > THEMES > INSTALL THEMES > UPLOAD THEMES. You can now upload your newly purchased theme in much the same way you add attachments onto emails. How simple is that?
It will look like this:
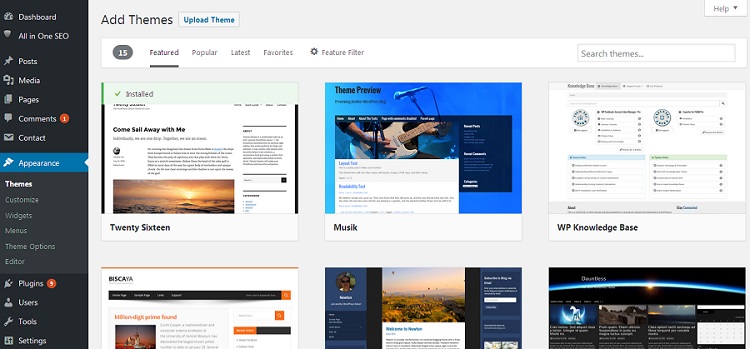
Click on “Upload Theme” to upload a .Zip file. Or use the Search themes function on the right, to search for specific free themes. Click on ‘Popular’ to see a list of the most popular free WordPress themes.
Your blank blogging canvas is now ready for the brushstrokes of your ideas. The rest is up to YOU!
Although you have free rein to express yourself in any way you want, it may be a good idea to build some structure into your blog. You should complete an “About” page so new readers can learn more about you and become more engaged. Add in a “Contact” page so fans or potential advertisers (how to make cash from your blog) can get in touch with you. Include your social media links so you can leverage your existing connections.
Thank you for reading my tutorial, I hope you have found it helpful. Now all that remains to say is:
“Welcome to the blogosphere new blogger, now GO BLOG!”

What are you waiting for? Follow the steps above, and in 30 minutes you will be the proud owner of your very own food blog!